
Sunday, 25 December 2011
Merry Christmas to me!
Look what Santa brought in the mail! If you are interested in reading more, the main post is on my Willowcrest blog here.

Saturday, 10 December 2011
Books and merry christmas to me
Just copying over a few paras from my main blog because they also apply to this one:
 Last Sunday I had some free time and decided to try out this online tutorial for making dollshouse books, on A Lavender Dilly blog which I think I found a while ago when I was looking for printables for the Fairfield. I resized the book covers to be about 1 inch high for 1/12th scale, and 1/2 inch high for 1/24th scale, and printed out a few sets, then glued them onto appropriately sized wood sticks. I'm pleased with how they've come out, and will put some of the small books into the Fairfield.
Here's hoping that you are looking forward to the festive season and if you are celebrating Christmas, I hope you have a very happy Christmas with lots of crafty presents. I am in the habit of buying my own Christmas presents (so that I get decent ones and not more Body Shop smellies). This year, Santa is bringing me a Greenleaf McKinley dollshouse in 1/12th scale, and a Diana dollshouse in 1/24th scale! They had a 25% off sale recently and I couldn't resist. The big question will be whether Customs decide to take an interest in what will be a relatively big and heavy parcel. The 25% saving may have to pay the duty in that case. Hopefully not. Merry Christmas!!

Here's hoping that you are looking forward to the festive season and if you are celebrating Christmas, I hope you have a very happy Christmas with lots of crafty presents. I am in the habit of buying my own Christmas presents (so that I get decent ones and not more Body Shop smellies). This year, Santa is bringing me a Greenleaf McKinley dollshouse in 1/12th scale, and a Diana dollshouse in 1/24th scale! They had a 25% off sale recently and I couldn't resist. The big question will be whether Customs decide to take an interest in what will be a relatively big and heavy parcel. The 25% saving may have to pay the duty in that case. Hopefully not. Merry Christmas!!
Wednesday, 9 November 2011
Look what I found
We've just come back from a dream holiday to New England, where I took a few hundred photos of inspirational historic wooden houses. I spotted this one, in Massachusetts I think. Does it look familiar to anyone? A little bit, perhaps, like a sibling to the Lydia Pickett? Particularly that gingerbread and the pointed windows.


Saturday, 24 September 2011
Born to shop
Today I spent several lovely hours at Miniatura, one of the UK's biggest dollshouse and miniatures fairs. It has a really nice range of traders and craftspeople, from the expensive elite down to the pile-em-high-sell-it-cheap. If you ever visit the UK, try to time your visit to coincide with one of their two shows each year, held at the National Exhibition Centre near Birmingham. It is accessible by public transport, and some years I have made the trip by train. But this year I was spoiled as DH drove me up, and dozed patiently in the car park while I shopped. He came inside to join me for a nice lunch, then went back out to wait until I was done. What a great hubbie! He's even stopped asking me how much I spent, although that is the result of 20 years of training so don't despair if you haven't got to that stage yet with your DH.
I enjoyed seeing all the marvelous things on sale, particularly the European traders from France, The Netherlands etc. I was mainly looking for 1/24th scale accessories for the Fairfield, but as usual it was 1/12th scale which predominated. There was a small amount of 1:24, but 1:48 seems to be picking up speed here in the UK and I think there was actually more of that scale than of 1:24 this year.
I work in all scales, so I did rather well finding things for some of my other houses as well. I found some good things for my Willowcrest quilting and knitting shop, but I will blog those on the Willowcrest blog along with a few strays purchased for other houses.
I also want to say 'Welcome' to the new followers that have joined us. Although you are coming in towards the end of the project, you can start right back at the beginning and follow the journey from cardboard box full of plywood right through to the furnished house. (You don't have to read it all, you can just look at the pictures... :) )
I know what you really want to see is what I bought, so here you are:


The very reasonably priced kits for the knitting bag and the bird feeding table, and I think also the knitted afghan, are from Model Village Miniatures. I used several of their excellent and cheap kits in my house, for example some of the boy's room furniture. A previous commenter noted that they didn't seem to have a website. I checked with them today, and they said they do mail order but don't have a website as they 'don't do computers'. They are willing to mail abroad and have a mail order catalogue, so here are their contact details and Sally Reader Miniatures.

A very nice day and I will enjoy putting things into the house. I probably won't get time to make up the kits for a while, as work is extremely busy and I am trying to hit some deadlines before we go off on our big holiday to New England in October.
On that topic - can any American readers recommend dollshouse shops I should visit in New England? We are doing the usual circuit around Maine, New Hampshire, Vermont, Mass., and Rhode Island and we are in a hire car so have some flexibility on where we go.
I enjoyed seeing all the marvelous things on sale, particularly the European traders from France, The Netherlands etc. I was mainly looking for 1/24th scale accessories for the Fairfield, but as usual it was 1/12th scale which predominated. There was a small amount of 1:24, but 1:48 seems to be picking up speed here in the UK and I think there was actually more of that scale than of 1:24 this year.
I work in all scales, so I did rather well finding things for some of my other houses as well. I found some good things for my Willowcrest quilting and knitting shop, but I will blog those on the Willowcrest blog along with a few strays purchased for other houses.
I also want to say 'Welcome' to the new followers that have joined us. Although you are coming in towards the end of the project, you can start right back at the beginning and follow the journey from cardboard box full of plywood right through to the furnished house. (You don't have to read it all, you can just look at the pictures... :) )
I know what you really want to see is what I bought, so here you are:

- The knitted afghan, teddy bear pillow, fairy doll, and teddy bear are for the little girl's room.
- The silk cushions are hopefully going to look nice on the kitchen window seat, which is also the destination for the two liquor bottles. The pillows were only .50p so hardly worth making my own.
- The bird feeding table is for the garden and I am planning to improve on the basic kit.
- The knitting bag will probably go in the living room.

The very reasonably priced kits for the knitting bag and the bird feeding table, and I think also the knitted afghan, are from Model Village Miniatures. I used several of their excellent and cheap kits in my house, for example some of the boy's room furniture. A previous commenter noted that they didn't seem to have a website. I checked with them today, and they said they do mail order but don't have a website as they 'don't do computers'. They are willing to mail abroad and have a mail order catalogue, so here are their contact details and Sally Reader Miniatures.

A very nice day and I will enjoy putting things into the house. I probably won't get time to make up the kits for a while, as work is extremely busy and I am trying to hit some deadlines before we go off on our big holiday to New England in October.
On that topic - can any American readers recommend dollshouse shops I should visit in New England? We are doing the usual circuit around Maine, New Hampshire, Vermont, Mass., and Rhode Island and we are in a hire car so have some flexibility on where we go.
Saturday, 10 September 2011
An earthquake, and a milestone
Hi there, this week the house suffered an earthquake, and I have reached a milestone with it.
The earthquake was because it fell off of the box that I balance it on (to keep it at eye level while I am working on it) sideways onto the bed, resulting in everything that wasn't stuck down ending up on the front wall. Luckily, as it was onto the bed, I was able to recover everything that fell out (I think).
It gave me the impetus to finally get the last couple of rooms finished and get things stuck in with grip wax or glue. And then - yes, all good things come to an end: I moved it out of my bedroom and downstairs to the dollshouse lineup.
I am still going to shop for accessories for it at shows such as Miniatura coming up in two weeks. And I will still build kits for it if I get any. But the main construction and the things that I set out to achieve back in April 2010 have now been accomplished. When I look back over the blog, I can't believe how much has been done to transform the house from a box full of plywood, to the finished article that I see today. I've had a wonderful time doing it, and you have all helped and supported me so much. From offering your opinions, and cheering me on, to Keli who shipped a big box with all her unused trim and porch pieces all the way from Michigan. It's almost been like building this house as part of a dollshouse club, and I want to say thank you so much to all of you for being part of it. I don't think I would have got nearly as much done if I didn't feel that I needed to keep this blog going for all of you.
Yes, there are so many more details that could be added to it: kitchen bits, cushions, pictures, towels, all the bits of ephemera that make a house look lived in. But the main parts are now all completed, and I need to have that corner of my own bedroom back - just moving out the folding table that the house was on has made the room seem so much bigger!
This won't be my last post, but I probably won't be posting as regularly in future. And what will I be doing? Well, I really should go back to my Willowcrest and finish the interior - I bogged down on the details and never finished the quilting shop or the workshop floor. You know what I'm like, I preferred building the house itself.
Anyway, here's what I did this week:
Boy's room
I've now stuck everything into the room with either Grip Wax or Tacky Glue. Since last week I've added a jewellery finding on the shelf to look a bit like a trophy, and I found a Burger King bag in my stash.


Little Girl's room
I dug out my bowmaker (made from sewing needles embedded in a block of Fimo) to make some ribbon bows to decorate the bed canopy. As usual, I couldn't remember how to use the bowmaker but I found this video on Youtube demonstrating on a much larger version.

I made four bows: two for the tie backs, and two to decorate the canopy. Then I pushed and prodded at the canopy to make it look a bit more presentable.

Then I stuck in the rest of the furniture and accessories.

Rest of house
The rest of the house just needed a tidy up after the earthquake.


Annoyingly, to take some of these pictures of rooms I hadn't worked on for a while, I had to brush away the dust first. Dust is such an enemy of dollshouses. After I moved the house downstairs, I wrapped it up temporarily in fabric to keep the worst of the dust out, while I think about how to display it.
If I manage to find any nice accessories at Miniatura, I will post them here so you can see what I got.
[edited next day: Forgot to add that I will still be blogging regularly on my main blog http://too-many-hobbies.blogspot.com/ , but I don't tend to put the minis on that blog because it confuses the quilters and knitters. I got a few comments in the past revealing that they didn't understand something was only one-inch-high and not real life! ]
Sunday, 4 September 2011
Clutter making
This week I've still been working on the printables to create more clutter for the boy's room. One of the reasons I prefer building houses to furnishing them, is that you can spend hours on making accessories with very little to show for it.
This week I've put together:
- board games: boards glued onto card
- board games in boxes: didn't use bottom of box. Cut piece of wood to correct size, painted edges in toning colour, and glued cover over board.
- keyboard: this didn't have instructions but I think I got the correct result. It's open underneath, and a bit floppy so I glued some card under the keyboard to make it look flatter. End result isn't great, I think I will hide it under the bench in the room so it's not on full view.
- school supplies: two notebooks with pages, a steno pad, a box of crayons.
- a mock Kentucky Fried Chicken takeaway box
- some fake books, and some covers glued onto real books.
- a puzzle, with an opening puzzle box
I took some of these and started to fill up the boy's bookshelf. Taking inspiration from my own DS's room, I shoved the games boxes in rather haphazardly.

I've pretty much used up the printables now that I found online. But I'm hoping to go to the big Miniatura dollshouse show at the NEC Birmingham in a few weeks, and I will look out for more 1:24 accessories there. There are usually some, even though the smaller scales aren't as popular here as they are in the States.
Monday, 29 August 2011
Nothing much to blog this week, sorry
The only minis I had time for this week were a few printables for the boy's room: board games, a KFC fast food carton, a few more posters. It was a short week as I had a half day on Thursday to collect my son's GCSE exam results (hugely important national exams for 16 year olds, which he aced, the lovely boy), and a holiday on Friday because it was a long weekend. So we turned it into a four day weekend and went camping in the Cotswolds in Oxfordshire, near Chipping Norton. I saw so many gorgeous old honey-coloured stone cottages which would make superb dollshouses. But the closest I got to mini-dom was seeing a few play dollshouses at a car boot sale (flea market).
Sadly that is our last camping holiday not only for this summer, but probably forever as DH has only ever been lukewarm about camping. So I've made the sad decision to sell our trailer tent (sob). Although the passing thought did cross my mind to wonder if I could make a 1/24th scale model of the trailer tent as a keepsake...
Sadly that is our last camping holiday not only for this summer, but probably forever as DH has only ever been lukewarm about camping. So I've made the sad decision to sell our trailer tent (sob). Although the passing thought did cross my mind to wonder if I could make a 1/24th scale model of the trailer tent as a keepsake...
Monday, 22 August 2011
Silk chiffon is the work of the devil

I did a couple of tests on it to see whether Fraycheck or Tacky glue would be better for finishing the edges. At this point I began to get some inkling of a) how much it frays and b) how unstable it is, biasing at random.

Of course, when I removed the silk in order to cut out the rectangle, it kept stretching and moving all over the place.


The plan for the next step was to fold over a pelmet at the top of the chiffon rectangles, gather them, and stitch them with tiny stitches using silk thread (so almost invisible) to the inside of the metal canopy. This is when I realised that silk chiffon is the work of the devil.


Then I debated what was the best way to stick the canopy into the room. I've gone with solvent-based adhesive, applying a thin layer to both surfaces and letting it set for five minutes, then sticking it into the room. I'm still trying to get the chiffon to hang naturally and to make the tiebacks look tidier, but after struggling with it for a while I decided to take a breather.

Saturday, 13 August 2011
The opposite of real life
I spent this week making clutter for the boy's room. This is the opposite of real life, where clutter just seems to breed like rabbits and I spend a lot of time trying to get rid of it from my real house.
 I remembered I had a number of cheap metal charms that I bought a few years ago. It might have been from Tee Pee Crafts but it could have been at a bead store. They are sort of 1/24th scale, apart from the telephone which is a bit clunky.
The telephone and handbag are for the little girl's room.
 I snipped off the hanging loops, filed the cut smooth with a metal file, and painted them with a base coat.
Then I spent a while painting them in acrylic paints. The telephone I painted to look a bit like a Fisher Price toy. After I took the finished picture, I painted the telephone and the top of the guitar body in clear nail varnish to make them shiny.

 I wanted to add some 'junk' to the top of the bed before I stuck it in (with gripwax) into the room. The blue bag or pillow is just some fabric gathered around a bit of filling. The games box is a block of wood with 1/4" scale game boards stuck on its faces. The Lego box, checkers board and paper car are all printables. I am especially pleased that I managed to fold and glue the paper car without using the magnifier! Hurrah!
You can't actually see any of this very well once the bed is in place.
 I found some images of castles and knights on the internet to serve as posters for the wall, and DH unexpectedly produced a plastic ladder which was close enough in scale to use. It's starting to come together but I need lots more junk.


The telephone and handbag are for the little girl's room.

Then I spent a while painting them in acrylic paints. The telephone I painted to look a bit like a Fisher Price toy. After I took the finished picture, I painted the telephone and the top of the guitar body in clear nail varnish to make them shiny.


You can't actually see any of this very well once the bed is in place.


Sunday, 7 August 2011
In which I admit defeat and put on a magnifier
About 20 years ago I stitched a petit point cushion for one of my 1/12th dollshouses, using 1 strand of embroidery cotton on silk gauze. I was able to do this without much problem, although it was easier in the bright light coming in a window.
Nowadays I look at that cushion and can barely see the stitches with my naked eye. For a long time it was just things in the distance that were a bit blurry, but now it is getting harder to precisely focus on close up things as well. Middle age sucks some times.
 This week I tackled the 1/24th scale printable pitchers and I had to admit defeat when I couldn't see the outline of the pale yellow jug sufficiently well to cut around it. Luckily DH (who admitted defeat some time ago) has a nifty magnifying visor, a bit like a welders helmet made of plastic, which I borrowed to give me hands-free magnification. It made the task of dealing with the quite small bits of paper much easier, although still fiddly.
The picture showes the 1/12th version, a completed 'twin' next to it in 1/24th scale, and the smallest pitchers under construction.
Do you see the pencil in the picture above, and its tapered black plastic point. I found the tapered point to be a really useful gluing jig for the smallest pieces. After curling the paper to shape, I applied a thin line of glue down one edge, inserted the pencil, overlapped the paper edges and pressed down against the pencil taper until the glue dried. The jugs are tapered as well, so the pencil point was just the right shape.
Another good tip which I forgot to mention last week: before cutting the 'teeth' at the bottom of the main body of the pitcher, lightly score a fold line along the bottom of the pitcher. I did this by placing a round plastic cap firmly down onto the paper to give me a curved edge against which I could draw the back of a knife along the line. This gives a much smoother line when you fold the teeth inwards prior to gluing on the base.
 The end results aren't perfect, but I think they are good enough. I stole a bit of Lady's Mantle flower out of the garden to put in this jug for the picture.
 And here is a picture of the two sizes of 1/24th jug, large and small, up against a large 1/12th jug.
The other thing I did this week was to have a trawl through various printable sites looking for printies that I could use for the boy's room as accessories. I printed off several possibilities so it looks like there is more origami in my future.
Nowadays I look at that cushion and can barely see the stitches with my naked eye. For a long time it was just things in the distance that were a bit blurry, but now it is getting harder to precisely focus on close up things as well. Middle age sucks some times.

The picture showes the 1/12th version, a completed 'twin' next to it in 1/24th scale, and the smallest pitchers under construction.
Do you see the pencil in the picture above, and its tapered black plastic point. I found the tapered point to be a really useful gluing jig for the smallest pieces. After curling the paper to shape, I applied a thin line of glue down one edge, inserted the pencil, overlapped the paper edges and pressed down against the pencil taper until the glue dried. The jugs are tapered as well, so the pencil point was just the right shape.
Another good tip which I forgot to mention last week: before cutting the 'teeth' at the bottom of the main body of the pitcher, lightly score a fold line along the bottom of the pitcher. I did this by placing a round plastic cap firmly down onto the paper to give me a curved edge against which I could draw the back of a knife along the line. This gives a much smoother line when you fold the teeth inwards prior to gluing on the base.


The other thing I did this week was to have a trawl through various printable sites looking for printies that I could use for the boy's room as accessories. I printed off several possibilities so it looks like there is more origami in my future.
Tuesday, 2 August 2011
Bit late this week
I usually blog on a Sunday but I'm a bit late this week. Partly because I didn't actually get to the part that I wanted to blog.
 Some time ago I printed off these printable French Flower buckets, pitchers and Pots from Miniatures.About.com in three scales. I've seen pitchers like this on other blogs, but I don't have a lot of experience with printables myself.
So I felt it would prudent to make up the 1/12th versions first, to familiarise myself with the project, before tackling the scarily small bits of paper for the 1/24th versions.
The printables come with coloured backing sheets. In a perfect world. you would print these doublesided onto heavy paper. In my world, I printed on normal paper at a location other than my home (which of course wouldn't be my office because that would be against policy) so I had to glue the two layers together, which made some of the printables not entirely flat. I painted both sides with Decoart MultiSealer, which strengthens the paper and gives it a slight sheen.
 I tried three pitchers, and a flower planter. The flower planter is a write off, it came out crooked plus I managed to smear the gold paint that I applied to finish the edges. The pitchers don't look too bad. I will put them in my Willowcrest quilt shop as artistic decor.
Making these took me quite a while so I didn't actually get to trying the 1/24th versions (which still look scarily small).

So I felt it would prudent to make up the 1/12th versions first, to familiarise myself with the project, before tackling the scarily small bits of paper for the 1/24th versions.
The printables come with coloured backing sheets. In a perfect world. you would print these doublesided onto heavy paper. In my world, I printed on normal paper at a location other than my home (which of course wouldn't be my office because that would be against policy) so I had to glue the two layers together, which made some of the printables not entirely flat. I painted both sides with Decoart MultiSealer, which strengthens the paper and gives it a slight sheen.

Making these took me quite a while so I didn't actually get to trying the 1/24th versions (which still look scarily small).
Sunday, 24 July 2011
Castling
This week I sewed some bed linen and cushions, and worked more on the castle bed.
For the settle bench, I cut a rectangle of craft foam and wrapped it in burgundy quilting cotton fabric, gluing it underneath with Thick Designer Glue. I made the cushions the same way that I made the cushions for the Day Bed in the living room, and used the same measurements (roughly 1/2" square).
For the bed mattress, I cut a rectangle of card to be the base, and glued foam (c 1/4" thick) onto the card to be the mattress. Then I covered it also with burgundy fabric. The pillow is a three sided bag, about 1/2" wide, which I stuffed with a little polyester stuffing. I made sure to use the selvedge edges of the fabric for the open end of the pillow, so there is a finished edge.
The duvet is also quilting cotton fabric, and I sewed it like a giant cushion, then fed in a rectangle of thin cotton quilters batting to be the padding. I hand-stitched the gap at the bottom closed. I took the measurements from the mattress, but made it shorter and slightly wider.
To make the bed look realistic, I used hidden stitches to catch down the pillow and the duvet, so they would lie flat. Then I glued the bedding/mattress into the bed structure (which was still open-backed at this point).


To finish the bed (apart from the ladder, which I haven't made yet), I touched up the paint around the artwork edges. I glued in three cut out shields on the inside wall above the pillow. Then I cut a piece of thin card to fit the back, and covered it with masonry paper. I glued this on with tacky glue to completely box in the bed.

 Now I need to add lots of accessories, sigh... It all looks far too tidy to be a boy's room. I think the boy must be older than the little girl, as the room furniture is more adult sized and looks older. Perhaps he is about 8 or 9, and she is about 4 or 5?
Of course, if I was going to be really realistic, i should drip stains all over the boy's carpet, cover the walls with posters and leave empty plates and glasses stacked here and there :)
For the settle bench, I cut a rectangle of craft foam and wrapped it in burgundy quilting cotton fabric, gluing it underneath with Thick Designer Glue. I made the cushions the same way that I made the cushions for the Day Bed in the living room, and used the same measurements (roughly 1/2" square).
For the bed mattress, I cut a rectangle of card to be the base, and glued foam (c 1/4" thick) onto the card to be the mattress. Then I covered it also with burgundy fabric. The pillow is a three sided bag, about 1/2" wide, which I stuffed with a little polyester stuffing. I made sure to use the selvedge edges of the fabric for the open end of the pillow, so there is a finished edge.
The duvet is also quilting cotton fabric, and I sewed it like a giant cushion, then fed in a rectangle of thin cotton quilters batting to be the padding. I hand-stitched the gap at the bottom closed. I took the measurements from the mattress, but made it shorter and slightly wider.
To make the bed look realistic, I used hidden stitches to catch down the pillow and the duvet, so they would lie flat. Then I glued the bedding/mattress into the bed structure (which was still open-backed at this point).


To finish the bed (apart from the ladder, which I haven't made yet), I touched up the paint around the artwork edges. I glued in three cut out shields on the inside wall above the pillow. Then I cut a piece of thin card to fit the back, and covered it with masonry paper. I glued this on with tacky glue to completely box in the bed.


Of course, if I was going to be really realistic, i should drip stains all over the boy's carpet, cover the walls with posters and leave empty plates and glasses stacked here and there :)
Sunday, 17 July 2011
An Englishman's home is his castle
I was thinking about the box bed pattern in the August 2011 issue of Dollshouse and Miniature Scene magazine, and I suddenly had this vision pop into my head of turning it into a turreted castle. Castle-themed furniture ideas immediately followed, so this week I have been working on the boy's room.

I started with some cheap kits that I picked up at Miniatura: a cupboard, a medieval-type settle bench, a simple chair, a tall bookcase, and some ready-made shelves (I only used the shorter shelf in the end). I made these up according to the directions, but I also used the same techniques that I learned doing the Flutterby bedroom: paint the exposed edges and surfaces with a toning paint (Citadel Foundation Paint 'Tallarn Flesh'), and apply printed artwork to give it a special touch.

I sealed the printed sheets with Decoart multi-purpose sealer, then cut pieces to fit onto the kits. I added little cut-out heraldic shields as an accent. Once a piece was finished, I touched up the white cut edges of the artwork with more of the brown paint. I need to make a cushion for the settle.


I've run out of wood so I have cut a piece of cardboard to shape for the top part of the bed front. I need to neaten up the edges, then paint them brown, then apply masonry paper to both sides. It would probably be sensible to make up the mattress and glue it in first before closing in the front of the bed. Something to do this coming week.
Sunday, 10 July 2011
Back from holiday
We spent the past week camping down near Southampton, so I haven't done any work on the house this week.
I took along my copy of the August 2011 issue of Dollshouse and Miniature Scene magazine. It has instructions for making a 1/24th scale box bed (where the bed is fully enclosed in a wooden shell, like a little room). I am toying with the idea of making this for the boy's bedroom, although I still like the original Miss LP boat-themed boy's bedroom that is only available in 1/48th scale. Perhaps I could scratch-build a 1/24th version of the boat furniture.
We stopped into the Dolls House, a shop in Whitchurch, Hampshire, which stocks a lot of the cheap imports and Dollshouse Emporium stuff. She had one lonely 1/24th wine bottle, which I bought to put in the wine rack of my Fairfield kitchen. I would have bought more if she had them, but that was the only one. Perhaps my occupants are very occasional drinkers.
As part of a belated spring clean, I have today dismantled my construction station in my bedroom and put away almost everything. I think the time is coming when this house will move downstairs to join my other houses and I will get that corner of my bedroom back. I have some paper printables that I want to make up, and I saw a neat idea for bunting that I may try out. But basically I am coming to the end of the plans and kits that I had for this house. I will still be looking out for 1/24th scale accessories at future dollshouse shows and keeping an eye out for the perfect boy's room furniture. I need to do a bit of a tidy up inside the house - and do some dusting! - before it is ready to move.
I'm thinking that it is long past time to go back to my Willowcrest house, which never did get finished as I bogged down on the vast amount of interior accessorising needed for a knitting and quilt shop. My DH came up with a great name for the shop: "The Quilted Sheep", which I rather like. I did a quick Google and of course others have already thought of it, but as my Willowcrest won't actually be a commercial business, I don't think they will mind :) The house has been waiting very patiently for some more attention. The knitting shop is basically done, but the quilting shop is still a mess and needs lots of mini quilts made for it. The workshop area on the top floor also needs some attention and accessorising. Although I have to say that the scale looks so big after working in 1/24th for so long!
Sunday, 3 July 2011
Re-purposing
This week I made a home for the teeny-tiny furniture so it doesn't get lost, and made a towel for the bathroom so that the occupants can finally dry their hands after washing them.
Play Trunk
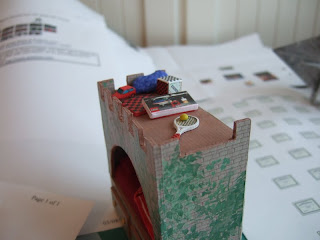
![]() I had this bare wood trunk which I picked up cheaply at a dollshouse show. I was thinking it would go in the little boy's room. But I wanted a home for the teeny-tiny furniture to reduce the chance of it falling out and going missing.
I had this bare wood trunk which I picked up cheaply at a dollshouse show. I was thinking it would go in the little boy's room. But I wanted a home for the teeny-tiny furniture to reduce the chance of it falling out and going missing.
![]() I painted it in colours to match the other furniture pieces in the girl's room.
I painted it in colours to match the other furniture pieces in the girl's room.
![]() I had some 'extra art' that came with the Flutterby bed, so I used it to trim the trunk.
I had some 'extra art' that came with the Flutterby bed, so I used it to trim the trunk.
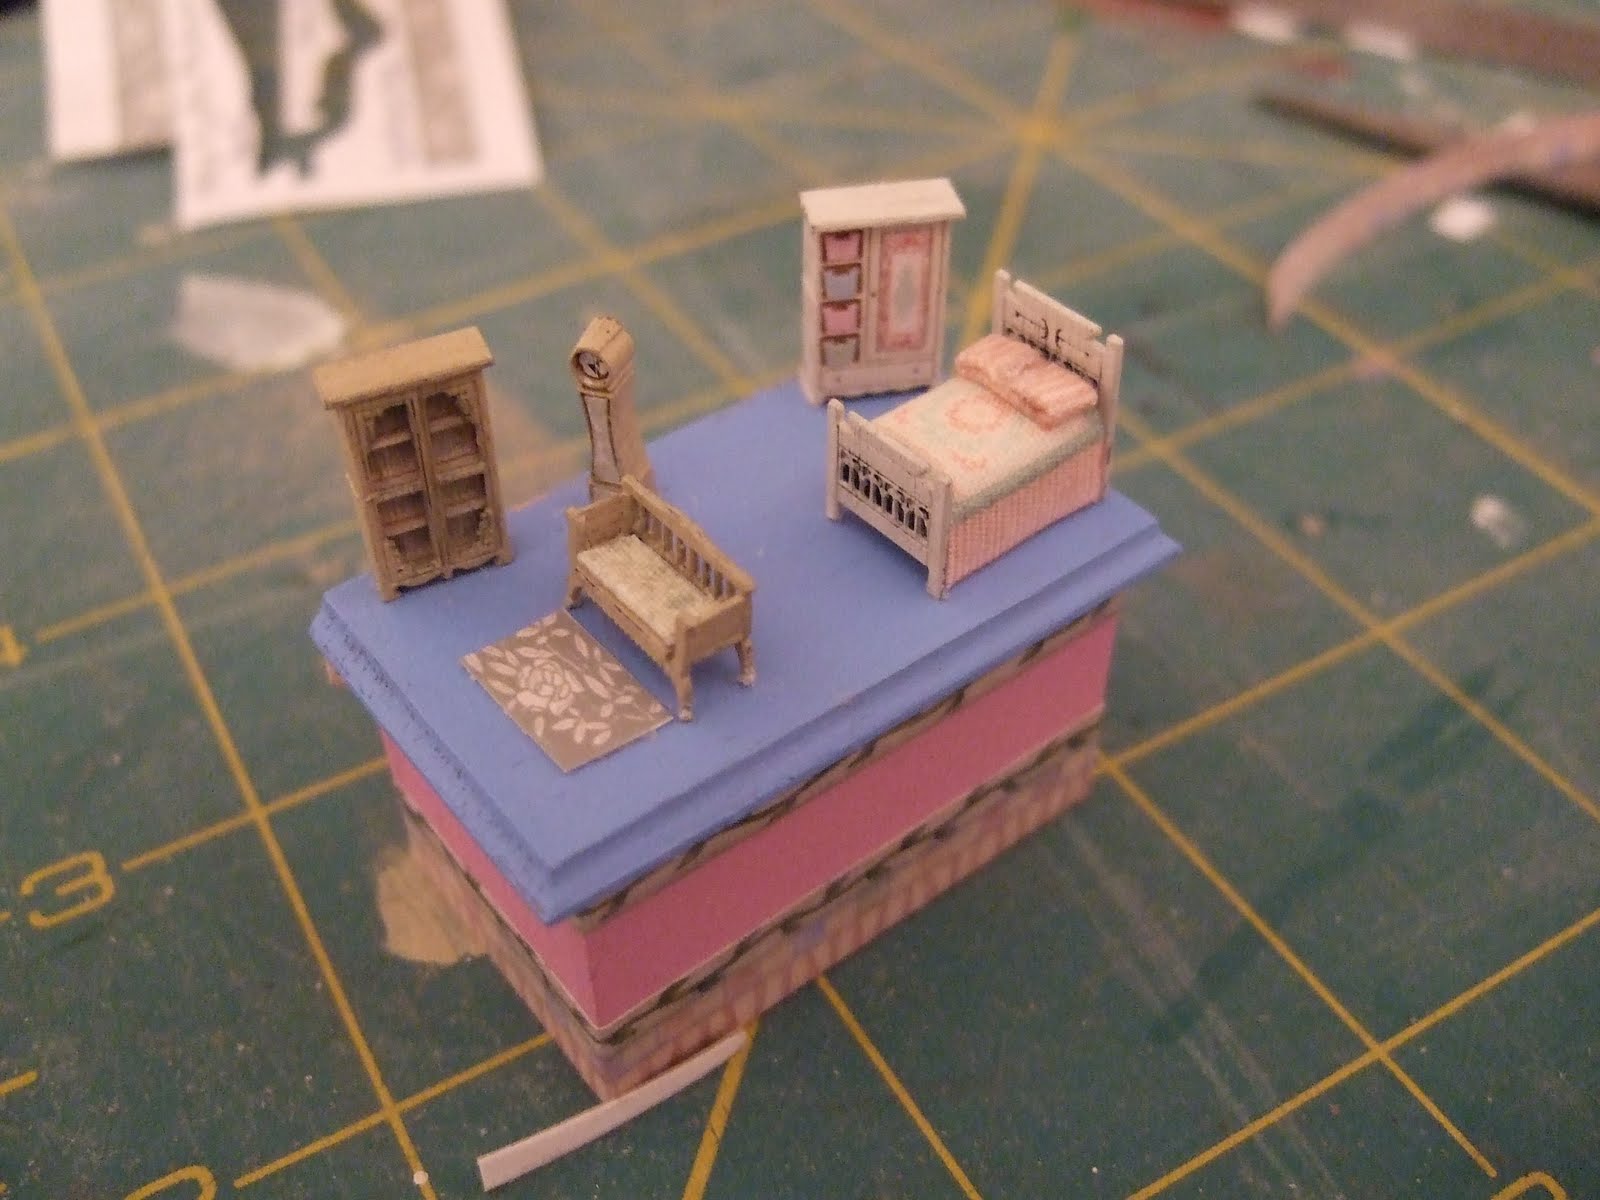
![]() Then I experimented with arranging the teeny-tiny furniture on top of the trunk. The viewing angle will be from the front of the room, so I angled the furniture to be most visible from the side. I used Tacky Wax to stick the furniture down, so it isn't permanent. The rug is a little scrap of art.
Then I experimented with arranging the teeny-tiny furniture on top of the trunk. The viewing angle will be from the front of the room, so I angled the furniture to be most visible from the side. I used Tacky Wax to stick the furniture down, so it isn't permanent. The rug is a little scrap of art.
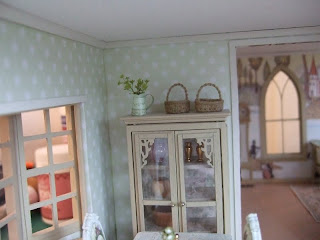
![]() And here it is in the girl's room.
And here it is in the girl's room.
Hand Towel for bathroom
![]() I bought some tissues from Cath Kidston last year, which were very pretty but not very good for their intended purpose as they are very coarse, more like serviettes. But I thought they might make a nice hand towel for the bathroom.
I bought some tissues from Cath Kidston last year, which were very pretty but not very good for their intended purpose as they are very coarse, more like serviettes. But I thought they might make a nice hand towel for the bathroom.
![]() I cut a small piece to be the towel.
I cut a small piece to be the towel.
![]() I looked around for a ring of the right size, and found this key ring which I could re-purpose. I used the medium ring that is connecting the key ring to the chain. I also found a little metal floret that I cut off of a brooch finding.
I looked around for a ring of the right size, and found this key ring which I could re-purpose. I used the medium ring that is connecting the key ring to the chain. I also found a little metal floret that I cut off of a brooch finding.
![]()
Play Trunk


Hand Towel for bathroom


I folded the paper in thirds, threaded it through the ring and glued it into shape. Then I glued the ring to the floret, and glued the whole thing to the wall.

Subscribe to:
Comments (Atom)
