The only minis I had time for this week were a few printables for the boy's room: board games, a KFC fast food carton, a few more posters. It was a short week as I had a half day on Thursday to collect my son's GCSE exam results (hugely important national exams for 16 year olds, which he aced, the lovely boy), and a holiday on Friday because it was a long weekend. So we turned it into a four day weekend and went camping in the Cotswolds in Oxfordshire, near Chipping Norton. I saw so many gorgeous old honey-coloured stone cottages which would make superb dollshouses. But the closest I got to mini-dom was seeing a few play dollshouses at a car boot sale (flea market).
Sadly that is our last camping holiday not only for this summer, but probably forever as DH has only ever been lukewarm about camping. So I've made the sad decision to sell our trailer tent (sob). Although the passing thought did cross my mind to wonder if I could make a 1/24th scale model of the trailer tent as a keepsake...
Monday, 29 August 2011
Monday, 22 August 2011
Silk chiffon is the work of the devil

I did a couple of tests on it to see whether Fraycheck or Tacky glue would be better for finishing the edges. At this point I began to get some inkling of a) how much it frays and b) how unstable it is, biasing at random.

Of course, when I removed the silk in order to cut out the rectangle, it kept stretching and moving all over the place.


The plan for the next step was to fold over a pelmet at the top of the chiffon rectangles, gather them, and stitch them with tiny stitches using silk thread (so almost invisible) to the inside of the metal canopy. This is when I realised that silk chiffon is the work of the devil.


Then I debated what was the best way to stick the canopy into the room. I've gone with solvent-based adhesive, applying a thin layer to both surfaces and letting it set for five minutes, then sticking it into the room. I'm still trying to get the chiffon to hang naturally and to make the tiebacks look tidier, but after struggling with it for a while I decided to take a breather.

Saturday, 13 August 2011
The opposite of real life
I spent this week making clutter for the boy's room. This is the opposite of real life, where clutter just seems to breed like rabbits and I spend a lot of time trying to get rid of it from my real house.
 I remembered I had a number of cheap metal charms that I bought a few years ago. It might have been from Tee Pee Crafts but it could have been at a bead store. They are sort of 1/24th scale, apart from the telephone which is a bit clunky.
The telephone and handbag are for the little girl's room.
 I snipped off the hanging loops, filed the cut smooth with a metal file, and painted them with a base coat.
Then I spent a while painting them in acrylic paints. The telephone I painted to look a bit like a Fisher Price toy. After I took the finished picture, I painted the telephone and the top of the guitar body in clear nail varnish to make them shiny.

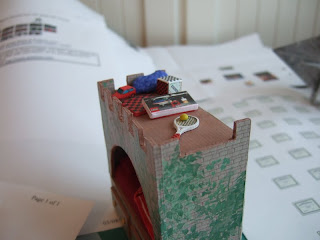 I wanted to add some 'junk' to the top of the bed before I stuck it in (with gripwax) into the room. The blue bag or pillow is just some fabric gathered around a bit of filling. The games box is a block of wood with 1/4" scale game boards stuck on its faces. The Lego box, checkers board and paper car are all printables. I am especially pleased that I managed to fold and glue the paper car without using the magnifier! Hurrah!
You can't actually see any of this very well once the bed is in place.
 I found some images of castles and knights on the internet to serve as posters for the wall, and DH unexpectedly produced a plastic ladder which was close enough in scale to use. It's starting to come together but I need lots more junk.


The telephone and handbag are for the little girl's room.

Then I spent a while painting them in acrylic paints. The telephone I painted to look a bit like a Fisher Price toy. After I took the finished picture, I painted the telephone and the top of the guitar body in clear nail varnish to make them shiny.


You can't actually see any of this very well once the bed is in place.


Sunday, 7 August 2011
In which I admit defeat and put on a magnifier
About 20 years ago I stitched a petit point cushion for one of my 1/12th dollshouses, using 1 strand of embroidery cotton on silk gauze. I was able to do this without much problem, although it was easier in the bright light coming in a window.
Nowadays I look at that cushion and can barely see the stitches with my naked eye. For a long time it was just things in the distance that were a bit blurry, but now it is getting harder to precisely focus on close up things as well. Middle age sucks some times.
 This week I tackled the 1/24th scale printable pitchers and I had to admit defeat when I couldn't see the outline of the pale yellow jug sufficiently well to cut around it. Luckily DH (who admitted defeat some time ago) has a nifty magnifying visor, a bit like a welders helmet made of plastic, which I borrowed to give me hands-free magnification. It made the task of dealing with the quite small bits of paper much easier, although still fiddly.
The picture showes the 1/12th version, a completed 'twin' next to it in 1/24th scale, and the smallest pitchers under construction.
Do you see the pencil in the picture above, and its tapered black plastic point. I found the tapered point to be a really useful gluing jig for the smallest pieces. After curling the paper to shape, I applied a thin line of glue down one edge, inserted the pencil, overlapped the paper edges and pressed down against the pencil taper until the glue dried. The jugs are tapered as well, so the pencil point was just the right shape.
Another good tip which I forgot to mention last week: before cutting the 'teeth' at the bottom of the main body of the pitcher, lightly score a fold line along the bottom of the pitcher. I did this by placing a round plastic cap firmly down onto the paper to give me a curved edge against which I could draw the back of a knife along the line. This gives a much smoother line when you fold the teeth inwards prior to gluing on the base.
 The end results aren't perfect, but I think they are good enough. I stole a bit of Lady's Mantle flower out of the garden to put in this jug for the picture.
 And here is a picture of the two sizes of 1/24th jug, large and small, up against a large 1/12th jug.
The other thing I did this week was to have a trawl through various printable sites looking for printies that I could use for the boy's room as accessories. I printed off several possibilities so it looks like there is more origami in my future.
Nowadays I look at that cushion and can barely see the stitches with my naked eye. For a long time it was just things in the distance that were a bit blurry, but now it is getting harder to precisely focus on close up things as well. Middle age sucks some times.

The picture showes the 1/12th version, a completed 'twin' next to it in 1/24th scale, and the smallest pitchers under construction.
Do you see the pencil in the picture above, and its tapered black plastic point. I found the tapered point to be a really useful gluing jig for the smallest pieces. After curling the paper to shape, I applied a thin line of glue down one edge, inserted the pencil, overlapped the paper edges and pressed down against the pencil taper until the glue dried. The jugs are tapered as well, so the pencil point was just the right shape.
Another good tip which I forgot to mention last week: before cutting the 'teeth' at the bottom of the main body of the pitcher, lightly score a fold line along the bottom of the pitcher. I did this by placing a round plastic cap firmly down onto the paper to give me a curved edge against which I could draw the back of a knife along the line. This gives a much smoother line when you fold the teeth inwards prior to gluing on the base.


The other thing I did this week was to have a trawl through various printable sites looking for printies that I could use for the boy's room as accessories. I printed off several possibilities so it looks like there is more origami in my future.
Tuesday, 2 August 2011
Bit late this week
I usually blog on a Sunday but I'm a bit late this week. Partly because I didn't actually get to the part that I wanted to blog.
 Some time ago I printed off these printable French Flower buckets, pitchers and Pots from Miniatures.About.com in three scales. I've seen pitchers like this on other blogs, but I don't have a lot of experience with printables myself.
So I felt it would prudent to make up the 1/12th versions first, to familiarise myself with the project, before tackling the scarily small bits of paper for the 1/24th versions.
The printables come with coloured backing sheets. In a perfect world. you would print these doublesided onto heavy paper. In my world, I printed on normal paper at a location other than my home (which of course wouldn't be my office because that would be against policy) so I had to glue the two layers together, which made some of the printables not entirely flat. I painted both sides with Decoart MultiSealer, which strengthens the paper and gives it a slight sheen.
 I tried three pitchers, and a flower planter. The flower planter is a write off, it came out crooked plus I managed to smear the gold paint that I applied to finish the edges. The pitchers don't look too bad. I will put them in my Willowcrest quilt shop as artistic decor.
Making these took me quite a while so I didn't actually get to trying the 1/24th versions (which still look scarily small).

So I felt it would prudent to make up the 1/12th versions first, to familiarise myself with the project, before tackling the scarily small bits of paper for the 1/24th versions.
The printables come with coloured backing sheets. In a perfect world. you would print these doublesided onto heavy paper. In my world, I printed on normal paper at a location other than my home (which of course wouldn't be my office because that would be against policy) so I had to glue the two layers together, which made some of the printables not entirely flat. I painted both sides with Decoart MultiSealer, which strengthens the paper and gives it a slight sheen.

Making these took me quite a while so I didn't actually get to trying the 1/24th versions (which still look scarily small).
Subscribe to:
Posts (Atom)
