Friday 30 April 2010

Coming together

My bay window arrived today!  Thank you, Judith of 'In Some Small Way' for sourcing it despite the volcano.  So this weekend, which is a long weekend here in the UK as Monday is a holiday, I can bash the window to make a window seat similar to the Pickett Hill (PH) house.  And then I can start final assembly of the house. And if you have come to visit my blog after reading about it on Judith's newsletter - welcome!


Meanwhile, I have been wallpapering.  I started out with the MiniGraphics 'Williamsburg' mural wallpaper that I ordered from Australia.  This is a 1/12th scale paper but I played around with it a bit to find the best placement for my doubleheight room which was c. 9" high.  I found a layout which gave me some nice trees in the right places, and I'm pretty pleased with it.  i think it is going to look ok with the 1/24th scale furniture because the figures in the scene are almost life size for that scale.  So it will be like Trompe d'Oeil (fool the eye) artwork.

I apply my wallpaper with ordinary household wallpaper paste:  I buy the paste as dry flakes and mix up small quantities which I keep sealed in a jam jar.  It lasts for months.  I apply the paste to both the wall and to the paper with a sponge brush, let the paste soak into the paper for a minute, then smooth it onto the wall with my fingers.  I wait until it is bone dry, then use a sharp scalpel to cut out the window and door openings.


I applied pale blue stripes to the boy's bedroom, pink stripes to the girl's bedroom, duck egg blue diamonds to the attic bathroom, and pale green with daisies to the kitchen.  This is all scrapbooking paper that tones with each other and luckily looks ok with the mural as well.


I took the opportunity while the front wall is still accessible to build my front door.  I wanted a look similar to the PH front door which has sidelights echoing the design of the front door.  I built my sidelights out of coffee stirrers, and found some tiny beading for the cross struts.  My Grandtline front door is a different design to the PH door, so I placed my cross struts to echo the design of my own door.  I cut more coffee stirrers to be the moulding around the inside of the door. Then after taking these pics I painted it all in GW Bleached Bone beige. I won't glue it in until the house is assembled.


I need some help from my readers.  Eventually I will need to make the green shutters that are on the PH, but the pictures I have do not show the detail clearly.  Can anyone tell me if the PH shutters actually have louvred detail or slatted detail?  Or are they just solid silhouettes?  Thank you in advance for any clarification.

Sunday 25 April 2010

Creeping along

It has been very frustrating to see this house on a daily basis, as it is in the kitchen, but not have much time to work on it.  However, my bay window is still stuck in transit courtesy of the Icelandic volcano, so it's not like I could glue it together yet anyway.

Here is the chimney glued into position.


Here is the false wall for the kitchen, in progress.


I've started planning for the vertical battens.  After a bit of playing around, I have decided the centres of the verticals will be 11/16" apart.  So I have now marked pencil lines on all the outside pieces to use as guidelines for gluing on the vertical battens once the house is together.

I've been planning where the wallpaper will go, and marking out pencil lines on the walls to guide me on where to glue the paper.  I am trying to avoid introducing wallpaper into an actual construction join, e.g. where the front wall meets the centre wall, as I want those joins to be wood-to-wood for strength.  I'm a bit worried that I am going to end up with gaps in my corners which in a 1/12 house would be disguised by folding the wallpaper around the corner in an underlap.  In this scale, I think I am going to get a generally neater finish by doing the papering before assembly.  If there are gaps, I may need to run something vertical down the corners to conceal them.

Sunday 18 April 2010

Several coats of paint later...

In a classic case of 'less haste, more speed', I have been regretting spraying some of my plastic doors and windows with gray spraypaint after we ran out of white spraypaint.  It has taken numerous coats of GW 'Bleached Bone' to cover up the gray.  At least it has given me an easy job in the evenings after work when the light isn't as good.  My new job gets me home later than my previous job, so we are having to forge a new routine which unfortunately doesn't leave as much time for crafting in the evenings.

I was able to buckle down this weekend and get a bit more done.  I have:


  • finished filling the unneccessary slots and holes, and sanded these to a smooth finish;
  • applied scrapbooking paper in a 'pine' colour to the ground floor, sealed it, then cut through to open up the slots again.  I experimented on a scrap with drawing 'planks' in very fine Pigma Micron pen, but decided I didn't like how obtrusive the lines were;
  • started painting the base a dark green while it is still easily accessible.  I'm not sure yet what treatment I will apply to the base but it seems prudent to give it a starting coat now;
  • cut the round window false wall for the bathroom out of foamcore, which pads out the Grandtline round window thickness quite nicely;
  • started gluing my chimney together, having cut two bits of thin wood (each slightly bigger than each other) to give a moulding effect between the two chimney segments;
  • drawn around the shape of my hexagonal floor to use as a template for railings later;
  • started drawing around the shapes of some of the attic walls to use as templates for wallpaper later;
  • applied scrapbooking paper to the bathroom floor and sealed it (in a slightly glittery white which looks like linoleum);
  • finished painting the plastic doors and picked out the lock plates in 'brass' paint.  Just need to glue on the knobs now;
  • designed the false wall for the kitchen (see below).

False wall for attic


The original Pickett Hill house (PH) has a built-in kitchen installed on a projecting wall - deep enough to allow a cabinet to run down the side of the projection.  As discussed in earlier posts, the Fairfield has smaller dimensions and the kitchen isn't going to be as big.  Also, the replacement 1/24th kitchen kit that I bought from Judith of 'In Some Small Way' is not the same layout as the PH kitchen.  After considering this all for a while, I have decided to build a projection out of foamcore to give additional depth to the centre wall where it backs the kitchen area, and to kitbash the kitchen kit to give a similar effect to the PH kitchen (with an island etc.)  In order to have the cabinet at the side (which will be visible through the doorway when you are looking at the living room), I will not take the false project to the full width of the centre wall-between-doorways measurement.  I reckon my false wall needs to be 12.6 cm high (sorry to American readers but I find metric more accurate for these small measurements), 3 cm deep, but only 9.5 cm wide.  This will give me an alcove on the right as you look in at the kitchen, where I can place a cupboard.  This will all make more sense when I've actually built and installed the false wall and can take a piccy!

Volcanic ash from the explosion in Iceland has grounded most flights in or out of Europe, so my Houseworks bay window is missing somewhere in transit.  I won't be able to glue the house together until I get the window, as I need to check I have cut the aperture the right size and also work out how I am going to do the window seat. 


Base with flooring and first coat of paint, painted doors, and chimney being glued.

Monday 12 April 2010

Away for the weekend

Not much happening as we were away for the weekend.  I did use the time one evening to draft a list of what needs to be done before I glue the house together - principally to take advantage of easy access while the pieces are still flat.  For example, I want to cut the wallpaper to size, and install the pieces that go on the central wall.  I want to cut the flooring to size, and install flooring in the bathroom and on the ground floor. I want to dry assemble the front door and surround while the front is flat, so it will be ready to glue in when the house is assembled.  I want to draw vertical guidelines on the outside walls for gluing on the vertical battens later.

Thanks to Shannonc60 from Australia, who suggested the Minigraphics range of 1/12 wallpaper which includes a few murals.  I have ordered a few sheets of the Williamsburg mural which looks like it might be perfect for the double height room if it isn't too out of scale.  I couldn't find a UK supplier so that is coming from an Ebay trader in Australia.  If it is suitable, then I will install it on the end wall before gluing the house together.

I had a brainwave about how to deal with the round window which is too thick for the thin Greenleaf plywood.  I think I can cut an inner wall out of foamcore, which won't show as all the edges will be hidden behind the roof.  That would make the wall around the round aperture thicker.

Meanwhile I am still painting windows and doors when I get the chance.  Having a new job is cutting into my craft time!

Tuesday 6 April 2010

Last day of freedom

I start my new job tomorrow, so today was my last free day.  And I had to spend part of it tidying the house for the in-laws and running errands. But I still got some work done on the house.  Progress will be a lot slower from now on as I will be tired in the evenings and will have more stuff to do on weekends now that I am not going to be home in the day.

In the morning, I taped the house together again to draw pencil lines to mark the floors and ceilings for cutting wallpaper. Now that it has been primed white, it is easier to see what the finished house will look like. I had to do a certain amount of cleaning out of paint from slots and tabs to get it to go together smoothly, even though I tried to be careful when I was painting.


Painting the plastic windows and doors:  I stuck the plastic windows and doors onto a stick with masking tape and took them outside to spray auto primer on them.  Then I started painting them with Games Workshop Bleached Bone which doesn't cover very well, so I will probably have to do two or three coats.


Filling unwanted slots:  There are three unnecessary slots which I need to fill in.  The way I fill slots is to back the slot with a piece of masking tape, then fill it with multi-purpose filler.  Once that is dry, I remove the masking tape, sand the first lot of filler, and finish it again using fine surface filler, then sand again once that is dry. This picture shows the first coat of filler prior to sanding and before cleaning up the remaining slot shape.


I am facing a bit of a challenge which is to find a suitable wallpaper for the double height room.  The original Pickett Hill (PH) house has a lovely mural paper of trees reaching up the wall.  It seems to be a bit feeble to just use ordinary paper, so when I was out today I was looking in a few gift shops at wrapping paper, trying to find something suitable - but no luck so far.  I do have some lovely wrapping paper with a Venetian scene of the grand canal, but I think it may be a bit too overpowering in this scale.

Monday 5 April 2010

Working hard but not a whole lot to show for it

I have put in several more hours today, but don't really have a lot to show for it in terms of things to photograph.  However, things are definitely moving along.

This morning I asked DH to take me to Hobbycraft where I bought:
  • 1.5x2.5mm styrene strip, which will be the vertical lines on the outside walls to simulate 'board and batten' siding.
  • some wider styrene strip to be skirting
  • some scrapbooking papers to be wallpaper and flooring - sadly I won't have Robin Betterley's beautiful artwork.
  • some more gesso.
  • some Games Workshop 'Bleached Bone' paint which is a sort of beige that I will use to paint the windows and doors.
Painting and sanding:  The rest of the day  has been loads and loads of painting and sanding.  It is very time consuming but the only route to a good finish on these Greenleaf kits.  So I have:
  • Painted one coat of gesso across the grain on all pieces (which I had sprayed with sealer last night), doing both sides where necessary (walls and floors). With a small brush, I painted gesso onto the stair treads/risers, and into the stairwall railings.
  • rubbed fine surface filler into the plywood edges that will be on show: the exposed edges of floors, the edge of the roof cutouts, the edge of the bay window cut out, the edges of the archways from the kitchen through to the living room. 
  • Sanded down all the gesso with a palm sander to a nice smooth finish.  I can still see a slight wood grain but it is a pretty good foundation for paint.  This also revealed a few more flaws that needed touching up with fine surface filler.
  • Painted an initial coat of matt white house emulsion on the outside walls.  I can't do a finish coat until the house is assembled and I have filled in around the tabs.
  • Painted an initial coat (or perhaps final, depending on coverage) of white 'suede effect' paint on the ceilings - essentially this is paint with a very fine grit in it.  I used it on the Willowcrest and found it gives good coverage and a good appearance.

Chimney:  While the paint was drying, I had a dig around in our shed to find wood scraps to make a chimney.  Once I started looking at the Pickett Hill (PH) chimney, I realised that I should have cut my left wall window openings closer to the outside edges of the wall.  I had centred my new window openings over the original Fairfield windows.  I should have planned my chimney first, then centred the windows into the space left between the chimney and the edge of the wall, which would have created openings further to the left and right than mine.  I think my version will still look ok, but the proportions won't be the same as the PH. Here you can see the basis of the chimney, I need to add an additional piece of flat wood between the two main sections as a moulding.  I won't glue the chimney to the house until the house is assembled, because I will need to cut out the roof pieces to allow the chimney to pass through.


Attic false walls:  This morning, when it was still too early to use power tools (family sleeping), I taped the house pieces together again to have a think about the attic rooms.  I need to create false vertical walls for the bathroom and master bedroom.  The bedroom wall is a little higher than the Lydia Pickett wardrobe, and the bathroom wall is a little higher than the Lydia Pickett bathroom shelf.  This removes a surprising amount of floor space, which I feel reluctant to do, but I guess it is necessary so that there are walls to position the furniture against.  There will be a door in each wall, suggesting that there is a corridor giving access.  My son suggested that I dangle a rope ladder out of the bedroom window since there is no actual staircase going up to the attic floor. 

Playing around with some vertical mock walls revealed a flaw in my floor plan:  I have replaced the small oval window from the PH with a larger round GrandtLine window (because I couldn't find an oval one).  Because the round window is bigger, running a false wall of the required height along to the window is going to place the wall right next to the window frame - very unattractive.  I think I am going to have to modify the PH floor plan for the bathroom.  I will run the vertical wall along as far as the door, then turn a right angle back to the roof.  This will leave a little open area near the round window.  I have decided to construct the false walls out of foam core since they won't be load bearing and I will need to cut the top edge at an angle to fit under the roof line.

Sunday 4 April 2010

Major structure now completed (touch wood)

Whew, another long day, fortified by frequent snacks of Easter chocolate as I worked away in the kitchen.  But I feel like I am getting somewhere.  And the weather cooperated and stayed dry so I was able to do my drilling and cutting outside, and sprayed on the sealer.

Modified roof pieces:  Here are the modified roof pieces I was talking about, which will fit over the attic rear bedroom.  You can see how I glued in new bits to fill in the outline so that I could cut the new shape (the black things are bits of plastic I glued on to give some extra strength.  Later I will make new internal walls to give a vertical back wall to the bathroom, and a vertical left wall to the master bedroom.


Staircase and balcony:  With my new side and front pieces cut, I could put the staircase in place and make some decisions about the staircase position, the boy's bedroom door position, and the cutaway for the balcony.  In order to prevent the boy plummeting to his death every time he opens his bedroom door (well, actually, I suppose he would only do that once...), I have filled in the staircase opening on the second floor (first floor in UK terms) by about half an inch.  This allows me to move the boy's bedroom door to the right., away from the back of the house.  Which means I can now cut back the second floor to start giving some double height to the living room.  I left the width of the door between the staircase and the edge of the floor, and dry assembled to see how it looked (picture where pencil is on the second floor).  I felt that it still wasn't a sufficient cutaway to give the sense of doubleheight space in the original Pickett Hill (PH) house .  After a bit of playing, I decided to cut the second floor even further back by giving it a flattened hexagonal shaping, which should make for quite a dramatic balcony.  You can see the effect compared to the ground floor in the next picture.  Meanwhile I have trimmed back the lower and upper railings for the staircase wall, and cut a new piece to be the back of the staircase (which you will see as you come in the front door).


Replacement doors and windows:
  In order to have the house look more like the PH, I am replacing the doors and windows.  I ordered all my additional components through Judith of 'In Some Small Way' here in the UK as a special order.
  • The original PH has larger gothic windows downstairs and smaller ones upstairs.  I am replacing the Fairfield windows with one size of Grandt Line window (3960) in 1:24 scale.  To insert these, I glued in the original Fairfield window punchouts, then centred the new window and lowering the opening by a half inch from the original window line (as the Gothic windows are taller) and cut the new opening out with an electric jigsaw. A future challenge will be that the Grandt Line gothic windows do not come with an interior frame, so I will have to try to cut one myself to cover the edges of the cutout on the inside.
  • I am replacing internal doors with the Grandt Line Victorian 4 Panel door (3947) in 1:24 scale which takes the same size cut-out as the Fairfield doors.  I re-cut the new opening for the boy's bedroom door by drawing around the old door before I glued it into the original opening.
  • To simulate the PH oval window in the bathroom, I am using Grandt Line Round window (3918) in 1:24 scale.  To cut the hole, I drilled a pilot hole, then used a hole cutter attached to my drill.  We have a hole cutter set which comes with various sizes of toothed circles, luckily one of them was the right size for the window.  A future challenge will be that this window is quite deep, more than twice as deep as the thin plywood, so I will have to pack it out somehow, or cut it down if possible.
  • For the French doors into the conservatory, I am using Houseworks H6011 Classic French Doors.  I glued in the original Fairfield windows on the back wall, then drew the new opening and cut it out with the jigsaw.
  • For a front door, I am going to use Grandt Line 3946 and build up side lights on either side of it from scratch.  I cut out one big opening on the new front wall, which will accept the new front door with the new sidelights.


Here is a picture of all the outside walls with their new openings.  I am not the most accurate cutter in the world, but I am fairly pleased with these.


In preparation for decorating, I smeared glue into all the cut-outs, tabs etc. that I am not going to be using, gluing in spare pieces of wood if required.  After those dried, I used Fine Surface Filler to smooth out the worst of the flaws, cracks, splinters from cutting etc.  I sanded the filler smooth with a palm sander, then took everything outside and gave it a spray with Plasti-Kote Clear Sealer.  This is a routine I got into when I was building the Willowcrest.  The Greenleaf plywood is not great, but with filling, sealing, priming and lots of sanding, you can achieve a fairly smooth surface for painting, papering etc.


Saturday 3 April 2010

Structural progress

I've been working on the house all day and am starting to feel like I am getting somewhere.  I also asked DH to take me to the DIY store this morning where I picked up a sheet of 4mm MDF for my replacement pieces, and some 15x21mm pine batten for the foundation.

I am tinkering and tweaking as I go along, so it is going to be hard to blog this in a logical order.  I don't know if anyone else will ever want to do a similar kitbash, but hopefully if I try to record my decisions and learnings, it will help out someone else.

A word about tools:  I do not have a massive tool shop but the Greenleaf plywood is so thin that you don't really need major power tools.  For small cuts such as trimming a tab, I am using my wood-cutting shears.  For longer cuts with the grain, I find I can usually cut through just by repeatedly running a Stanley knife along a metal ruler, cutting a little bit more each time.  This doesn't work very well across the grain, so I cut partway through with the knife, then finish off with the feeble little scroll saw on my Unimat (a toy-like power tool available from Hobby's).  For cutting new slots, I drill out the slot and tidy up with the Unimat or a Stanley knife.

Removal of bay windows:  I realised last night that I won't be using any of the bay windows, so I cut off the bay window protrusions on all floors, just leaving a little tab the thickness of the plywood.  The tab will fit into the horizontal slots on the vertical pieces so that the floors are still supported.  I trimmed the left wall completely flush with the side of the porch, creating two new tabs as I cut, because the Pickett Hill house (PH from now on) has a flat left wall with no bay.

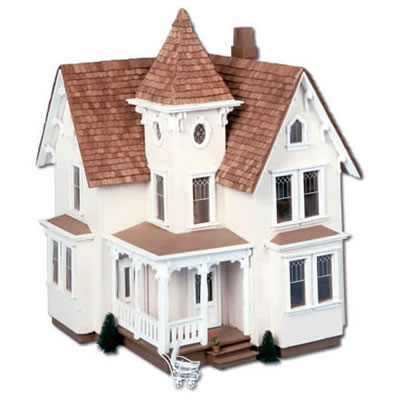
The continuing saga of the staircase:  I spent some time last night playing with the staircase positioning once the glue had dried on the treads and risers.  I've come to the conclusion that the PH is a little bit longer along both sides of the 'L' shape.  That's why the PH has more room for its staircase, and why the PH dining room extends further forward.  I am not going to contemplate trying to lengthen my Fairfield, so after trying out various options, I have decided to reverse the staircase.  By reversing the staircase (stairs facing the back), I can cut off the banisters built into the centre wall and open up that archway for a similar effect to the PH.  The stairs will protrude slightly into the smaller archway on the right (looking from the back) which I widened as much as I could (about 1/4").  I cut both archways to be a little higher and squared them off.  I think that I can now use the staircase wall by also reversing it, but I'm not sure about positioning a new door for the boy's bedroom.  I still want to cut back the middle floor for a balcony-effect similar to the PH, but I need to leave room for the stairs and the bedroom door. 

Replacing the foundation:  
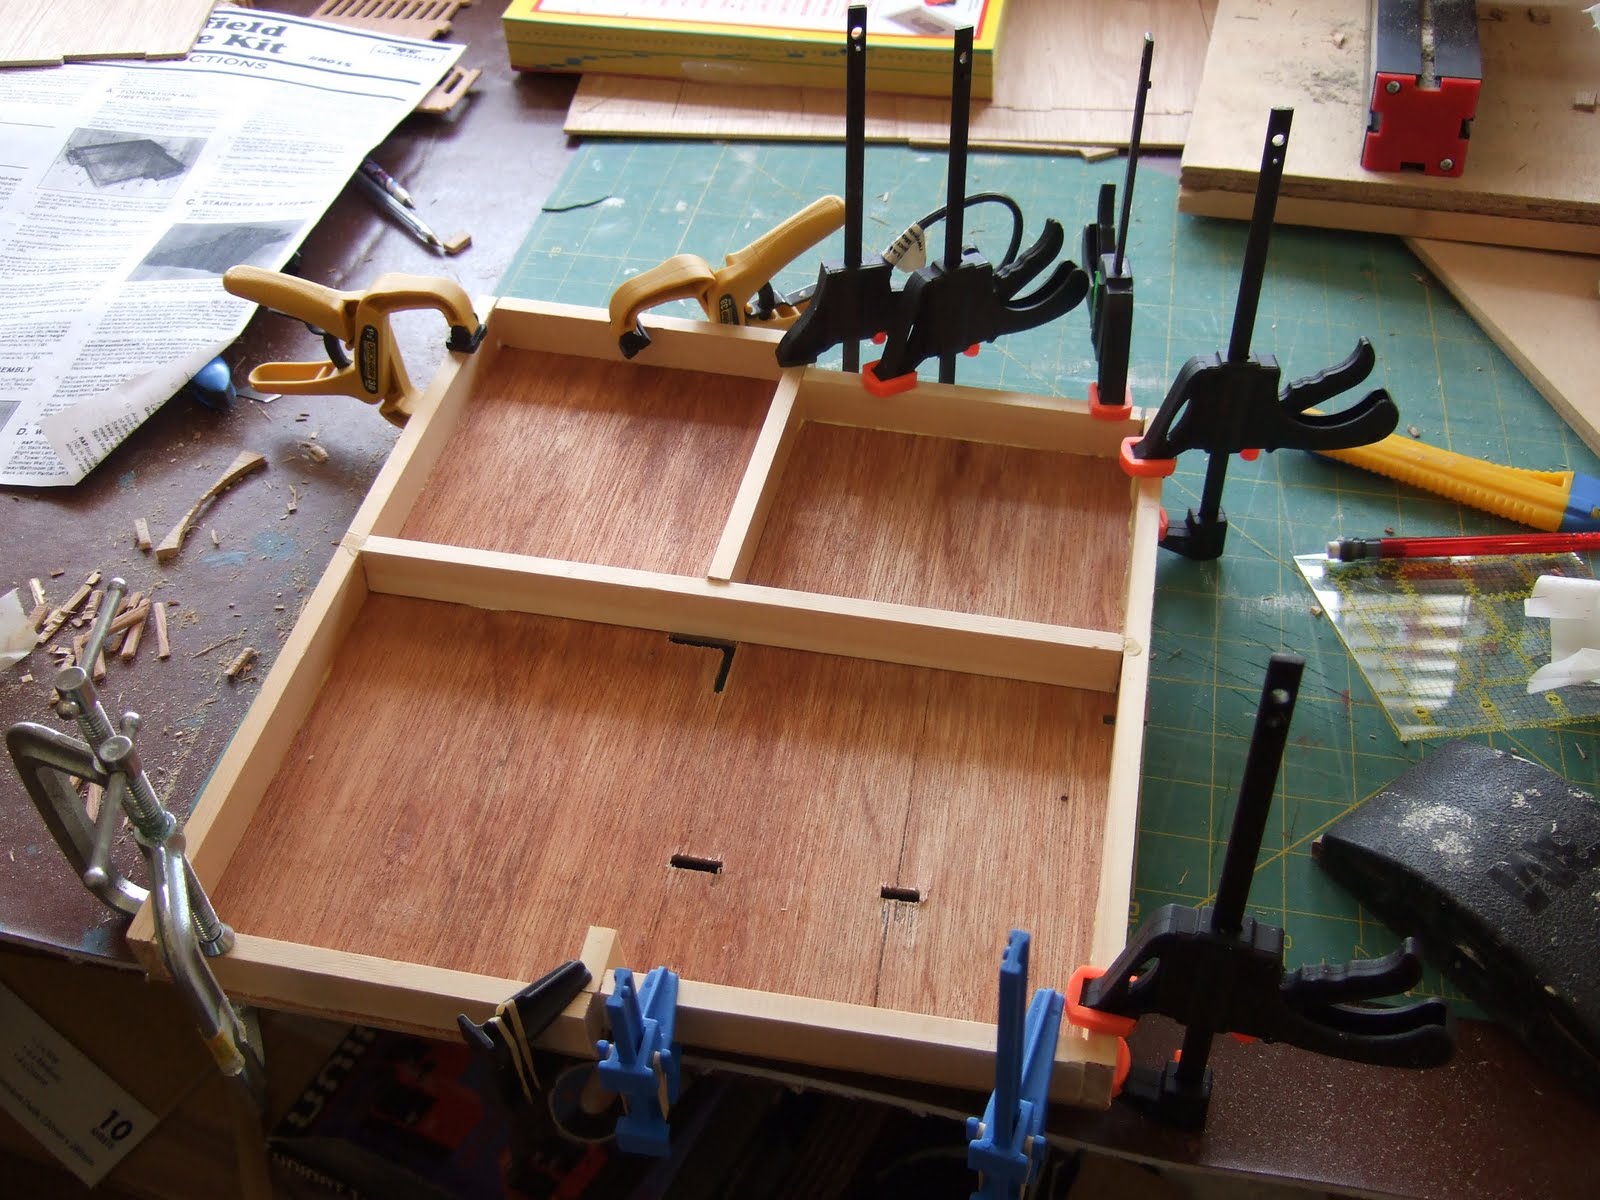
The Greenleaf Kit comes with several thin plywood pieces to glue underneath the ground floor to act as a foundation.  While these work surprisingly well, they are not terribly robust and they are fiddly to glue.  I have replaced these with 15x21mm pine batten pieces, attached with carpenter's wood glue flush with the outside edge of the ground floor.

Removing the Tower:  I am not using the Tower and instead am going to have a replacement front wall in the same position as the Tower front wall but extending to the left edge of the house where it will meet up with my new left wall.  Therefore I did not punch the Tower left wall slot out of the first floor, I cut off the Tower right wall flush with the attic floor, and I filled in the hole in the attic floor next to the Tower floor so that the front edge of the attic floor is going to be flush along my new front wall.

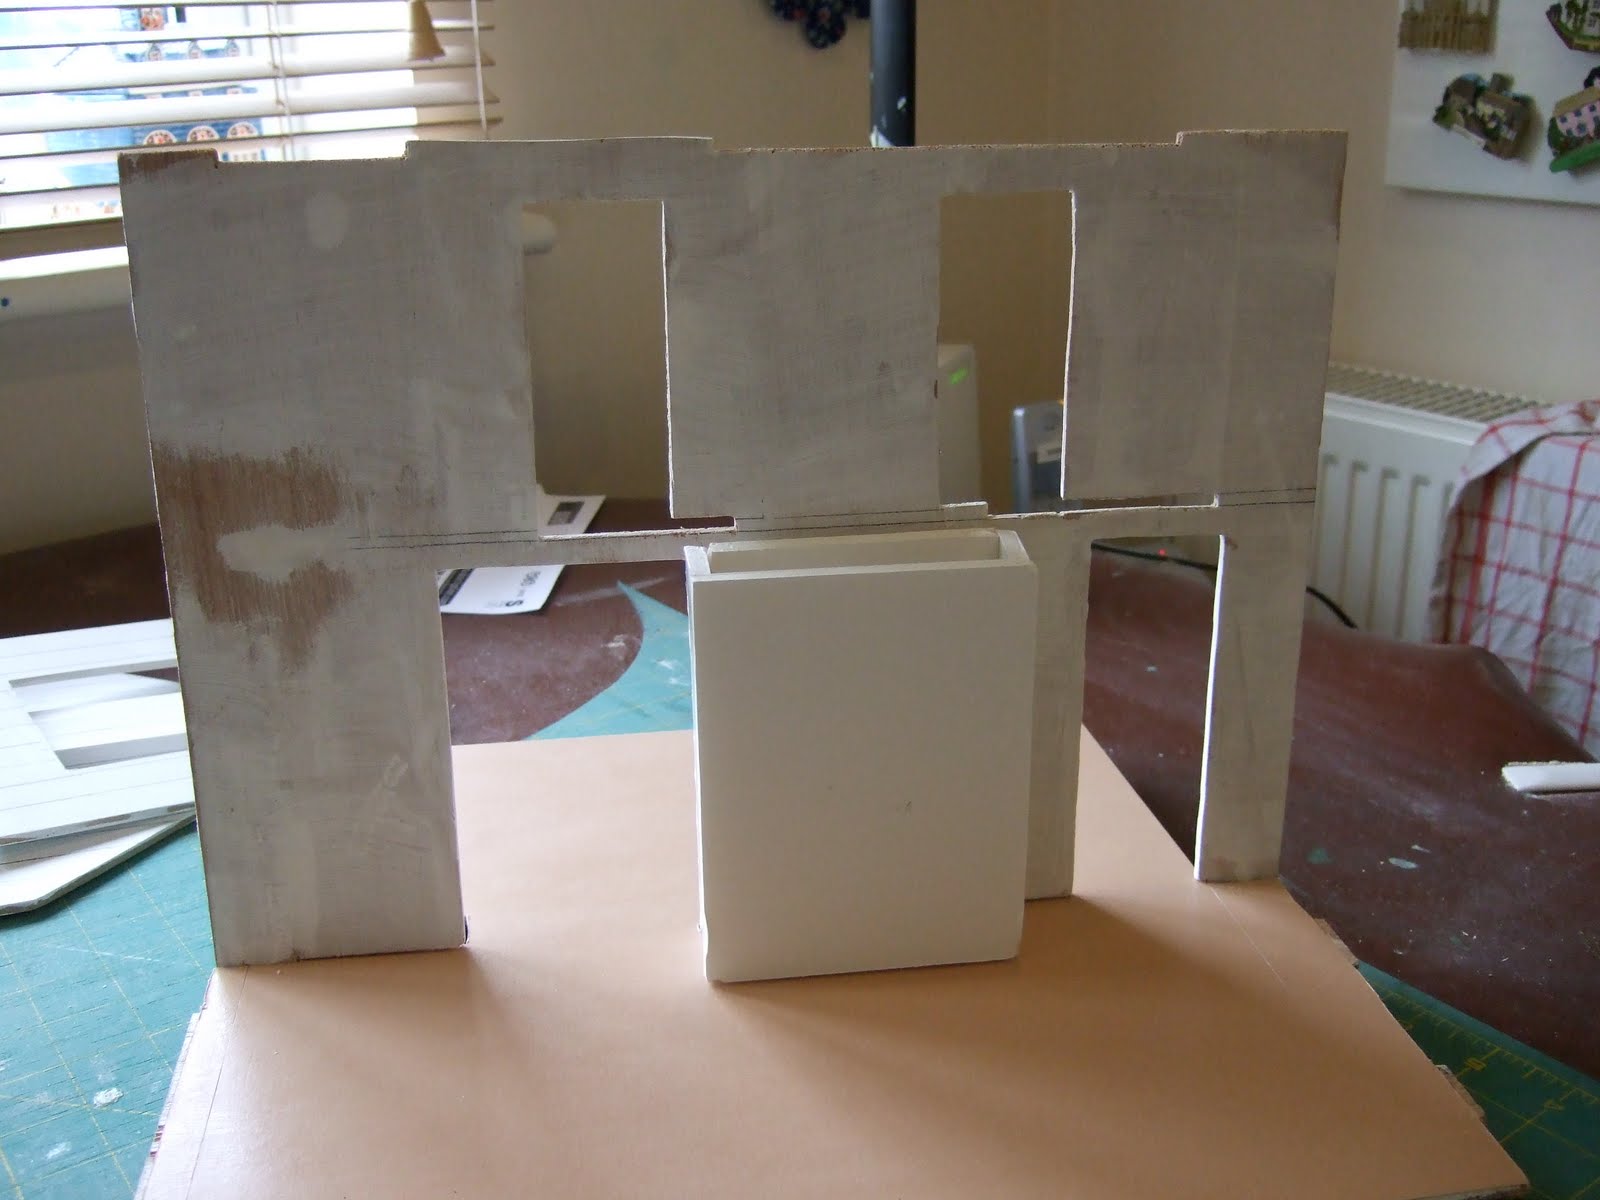
How I fill in unwanted holes, or glue in pieces I am not punching out:  I have a pretty low-tech solution which is to smear carpenters wood glue all along the piece I am not punching out, push it back into its gap, and put a weight on it to keep it flat until it dries.  For unwanted holes, where possible I am trying to use adjacent areas on the plywood sheet to fill in the holes.  As I am not using many of the kit pieces (chimneys, fireplaces, tower, bay windows etc.) I can sometimes just glue in enough pieces to 'build' out the plywood until I can draw a new cutting line.  Where there is a noticeable gap, I smear sawdust into the gap on top of the wet glue, then sand it down after it dries.  In the picture you can see that I am filling in the front edge of the attic floor prior to cutting out the new shape.  The beauty of doing the glueing actually in the plywood sheet is that you get automatic clamping all along the edges because all the pieces are pushed into their gaps like an assembled jigsaw.

Cutting replacement front and left wall:  I drew out the replacement walls on my sheet of MDF then cut them out with a handheld electric jigsaw.  I have marked in the new gothic window positions and new front door, but haven't cut them yet until I am sure I have got the structure right.  On the front wall, you can see that I have cut a slot which carefully locks with the porch roof protrusion on the first floor.  However, once I had it dry assembled, I realised that the Fairfield porch roof is too high and too close to the window.  So now I have cut off the porch roof and will construct a replacement roof lower down at a later stage. When marking out the new pieces, I used existing Fairfield pieces to mark the correct placement of slots and tabs, and kept the attic roof height the same (5.5 inches) as previously.  Later I will build a chimney on the left wall like the PH.


New roofline:  Once I had the replacement front and left wall in place, I could start finessing the new roofline.  I don't have a picture as the glue is still drying, but I am going to re-use all existing roof pieces.  I had to re-cut the angle on the left-gable pieces to match the new roofline of the extended left wall, and I am 'filling in' the back roof piece over the master bedroom so that I can recut an opening that is closer to the outside wall and is shaped like an upside down 'U' rather than the Fairfield 'L' shape.  This probably makes no sense unless you have the kit pieces in front of you, I will take pictures once I get them cut out.


Just for fun:  I couldn't resist having a play with some of my Lydia Pickett furniture, just to see what it is going to look like in situ.


Friday 2 April 2010

Where to begin?

It's the Easter weekend and I'm not starting my new job until Wednesday, so it seems like an ideal time to make a start on this kitbash.

I've once again taken over the dining table to be my work area - my family got so used to this arrangement during my 18 month Willowcrest build that they have accepted eating on the picnic table virtually without comment.

The kit is going to require some significant modifications to achieve a similar layout to the Pickett Hill house.  It is never going to be exactly the same, but I would like it to be similar. The first step is to go through the kit to check what I've got.  I'm off to a good start:  I'm not missing any plywood sheets, and only a couple of them are slightly warped.

The next step is to start carefully punching out the sections of the house that I think I am going to use, and doing a dry run with masking tape while I start thinking through the modifications.  I'm trying not to punch out any slots or windows/doorways until I really have to, as many of these will not be used or will be altered in shape.

I'm making a list of what I am going to be changing, as I think of things while I am doing the dry run.  For example,
  • my house is not going to have a tower, but I do need a wall where the tower front wall is.  I think I am going to have to cut a new front wall that runs the full width of the hallway, with a new centred door aperture for my Grandtline front door. I will need to cut down the right tower wall to be level with the roofline.
  • The left wall needs to run the full width of the left wall.  So I will cut off the left bay completely, and cut a new doublewidth left wall.  This will change the roofline of this gable, so I may need to cut new roof pieces.
  • I am not going to use the Fairfield chimney, so I am not punching out any of the holes through which it passes.  I will need to make a new dividing wall between the bedrooms since the chimney/hearth wall won't be dividing these.
  • I will replace the right front bay with a Houseworks H5008 Victorian bay window, and the rear windows with Houseworks French Doors opening into a (separately purchased) conservatory.
The biggest puzzle is what to do with the staircase.  As far as I can tell from the Pickett Hill photos, their staircase is hidden from view and possibly not even fully functional.  I want to be able to cut back the floor of the bedroom to create a doubleheight living room like the Pickett Hill, but at the moment the Fairfield staircase is in the way.  I am going to have to build the staircase first to see how big it is, so I have started gluing on the treads and risers.

Getting Started

Welcome to my new blog where you can follow my progress as I kitbash a 1:24 scale Greenleaf Fairfield dollshouse kit into a home for my Miss Lydia Pickett furniture kits.

Who is Miss Lydia Pickett, and why does she need a 1:24 scale home?
The Miss Lydia Pickett Cottage Collection is designed by Robin Betterley in the USA.  The collection includes several different sets of laser-cut furniture kits styled in a sort of 'Scandinavian meets Shabby Chic' design ethos, absolutely adorable, with loads of extra features like Robin's lovely artwork and extra accessories. Some of the kits are available in several scales:  1:48, 1:24, 1:12 and even two-inch scale.  Most of the kits include a whimsical short story about the fictional Miss Lydia Pickett, a dog who lives with the family whose home is furnished with the kits.

I was the founder member of the Miss Lydia Pickett kit of the month club back in 2007, being run by Judith Dowden of In Some Small Way here in the UK. Members of the club pay a fee each month in return for kits in 1:48, 1:24 or 1:12 scale.  It is a way of spreading the cost while you collect and build the kits.  I chose to collect the kits in 1:24 scale as I thought 1:48 would be too fiddly and I don't have room for any more 1:12 houses.  Judith runs a great club, my kits always arrived promptly and well packed, and I really enjoyed building them.  If I had any queries, Judith always responds quickly by email.

I was excited to learn that Miss Lydia Pickett was going to have her own house, the Pickett Hill, laser cut by Suzanne and Andrew's Miniatures and designed in collaboration with Robin Betterley.  I started saving up for it.  Then came the credit crunch, a bad economy, and an eventual announcement that the Pickett Hill would only be available in 1:48 scale.  Not only that - many of the furniture kits would not be available in 1:24 scale either.  Judith stepped into the breach with her own kits for a kitchen and the children's bedrooms in 1:24 - but what about a house?

I spent a year or so looking out for an appropriate 1:24 scale house, at dollshouse fairs and online, but nothing spoke to me in the way that the Pickett Hill farmhouse gothic style did.  Then over Christmas, I happened to be looking at a picture of the 1:24 scale Greenleaf Fairfield dollshouse, and realised that it was an extremely similar shape and layout to the Pickett Hill.  In fact, it is so similar that I wonder if it was part of the design inspiration.  And I got to wondering if the Fairfield  (left) could be kitbashed to look something like the Pickett Hill (right).  At last I would have a 1:24 home for my furniture kits.


And then I got made redundant.  Which was bad, but I did get a big severance payment.  So guess what I bought with it?  Yes - a Greenleaf Fairfield dollshouse kit.  And I was able to order, through Judith, a bunch of accessories which I hope are going to help it transform into my own version of the Pickett Hill:  some Grandtline gothic windows, Houseworks french doors, gingerbread trim and a Houseworks bay window.

A little bit about me
I built my first dollshouse in Canada from scratch plans published in McCall's Needlework and Crafts magazine when I was 18 and missing a term at university because of mononucleosis.  My dad helped me cut out the plywood on the tablesaw and let me have the use of his woodshop.  I still have that house on the landing of my house here in the UK.  Later I actually built another Fairfield in my 20s, but made rather a mess of it as I believed the instructions about using a hot glue gun (this was in the days before the internet - remember those?).  That got sold at a flea market much later.  Once I settled in the UK, I built other houses either from scratch or starting from purchased shells.  A few years ago I built the Greenleaf Willowcrest, and you can read about that build on my other blog here.  It turned out pretty well as I was able to benefit from all the accumulated expertise that is now available on the internet - especially on the invaluable Greenleaf forum.  I'm still finishing the inside of that one - it always takes me a lot longer to do the insides than it does for the actual build.  I work in scales from 1:144 up to 1:12, but I suppose 1:12 is my favorite, closely followed by 1:24.