This week I've been finishing off the roof.
I decided to take DS's suggestion and drybrush the roof. I drybrushed in Anita's Dusty Green colour, which is like a lighter shade of the Leaf Green I used on the roof. I started out on a little corner to see if I liked it, and was amazed at how it instantly brought the texture of the roof to life. So then I did it all over the roof. In this photo, I was trying to show the contrast between the area at the right (drybrushed up to chimney) versus the area above the bedroom cutout (not drybrushed) but it was hard to get it to show in a photo.
This is a closeup of a drybrushed area. You can see how the lighter colour picks up all the texture of the wooden shingles, and also defines the edge of each row. The extra shading makes the roof look less toy-like.
Then I had the pleasure of finally unwrapping all the cling film and bubble wrap from the house - like opening a Christmas present!
I had already spraypainted the trim with primer, so I gave it a few coats of first, white acrylic, and finally the white emulsion to match the house. I love the trick of resting the trim on pieces of dry spaghetti to stop it sticking to the table - wish I had known that one years ago.
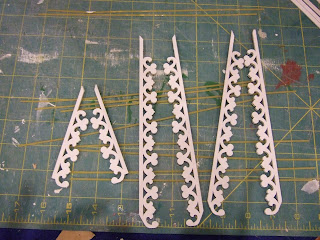
I had previously traced around the roof peak onto a piece of paper, before I put the roof on, so that I would have a pattern to use when cutting the trim. I am using the same Houseworks trim that I used for the conservatory roof. I played around with it a bit to see how I could fit it into the roof peak, and also have an interesting finish at the bottom edge of the roof. Then I cut it carefully, and sanded the cut pieces to shape them into a natural looking curve.
Here are my three sets of trim, after I'd touched up the cut areas with white paint.
I glued my gingerbread trim underneath the roof, flush with the edge (as in the right of the photo) and then added a plain stick to trim the edge of the roof (as in the left of the photo). I used a trick Rik Pierce taught us when I took a workshop with him, which is to add dabs of super glue along the length of wood, in between the white glue, to give some instant grab while the white glue sets.
The trim on either side of the chimney, at the side of the house, stands out from the wall. I finished the gap at the top with another little bit of stick.
I'm quite pleased with the trim, it really brings the house to life. Once the glue has dried hard, I am going to go in and touch up the joins and cut ends with white emulsion.
Saturday, 25 September 2010
Subscribe to:
Post Comments (Atom)


It looks so fantastic! I love all of the gingerbread trim and the green roof! It will be an amazing house when you have finished!
ReplyDeleteThat really looks fantstic! It ties the conservatory in with the house. Very pretty house.
ReplyDeleteI still can not believe that this was made from a fairfield kit. It's so nice to see it coming together like this. Love the trim and the shading on the roof makes a huge difference. I've been in 1/24 land today and it's been fun. lol
ReplyDeleteLovely! Wow.
ReplyDeletejust fabulous what your doing here...love it!!! :D x
ReplyDeleteStunning! And dry brushing gives great dimension to the roof.
ReplyDeleteWow, so pretty! You are doing amazing! I'm in awe of your skills.
ReplyDelete~bunny